Scene
Applications in Viro consist of Scenes, represented either by Scene or ARScene objects. Scenes are the 3D equivalent of the Views found in most 2D application frameworks. They contain all the content that Viro renders in AR/VR: UI controls, 3D objects, lights, and more.
An application in Viro typically contains one or more of these Scenes. Scenes are rendered on Android by injecting them into a ViroView. There are several types of ViroView available, one for each supported platform.
Basic Scene
A simple Scene is provided below. The scene contains a single Text object, which displays the text "Hello World".
Text text = new Text();
text.setPosition(new Vector(0, -0.1f, -1.0f));
text.setText("Hello World");

Node node = new Node();
node.setGeometry(text);

Scene scene = new Scene();
scene.getRootNode().addChildNode(node);

ViroView view = new ViroViewARCore(context, null);
view.setScene(scene);
Positioning Objects in a Scene
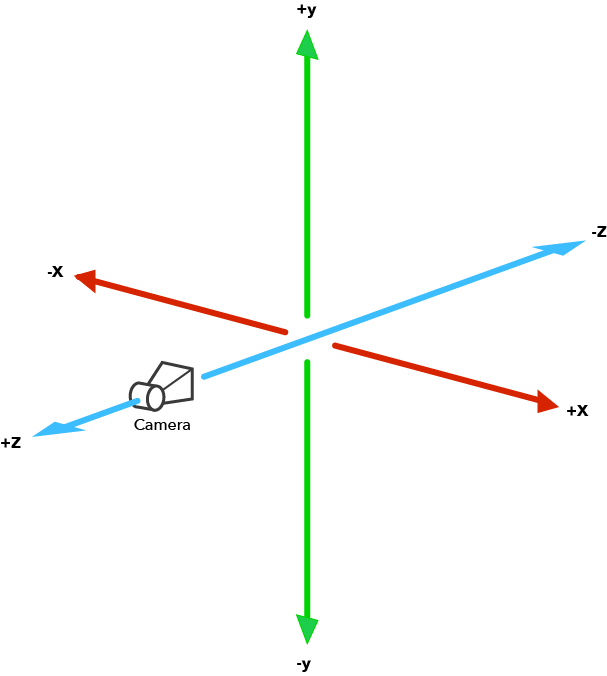
Viro uses a right-handed coordinate system, where the direction of view is along the negative z-axis. The point of view can be modified by changing the Camera. By default, the camera is positioned at [0, 0, 0] and looks in the direction [0, 0, -1]. In platforms with only 3DOF (3 degrees of freedom) support, the end user is only able to control the rotation of the camera. The camera stays at [0, 0, 0] until programmatically moved by the developer. In platforms with 6DOF platform (6 degrees of freedom), the end user can move about their world, and the camera in the Viro Scene will move in kind. ViroViewGVR and ViroViewOVR only support 3DOF, while ViroViewARCore supports 6DOF.

Objects in the scene are positioned in this 3D coordinate system via Node.setPosition(Vector). As scenes grow in complexity, it is best to take advantage of Viro's underlying Scene Graph when placing objects.
Scene Backgrounds
The background of a scene is the content rendered in the distance, behind all the objects. This background can either be a 360 degree image, or a skybox. In augmented reality, the background is a real-time video feed of the user's camera.
To render a 360 image as the background use Scene.setBackgroundTexture(Texture), as shown below.
Bitmap image = loadBitmap(); // Load an image into an android.graphics.Bitmap
Texture texture = new Texture(image, Texture.Format.RGBA8, true, true);

Scene scene = new Scene();
scene.setBackgroundTexture(texture);
To render a skybox, use Scene.setBackgroundCubeTexture(...) or Scene.setBackgroundCubeWithColor(...).
A skybox is a cube with 6 sides that encloses the user.
The six sides can either be given a solid color by using the latter method, or they can each be assigned a texture by using the former. In the example below, each side of the skybox is assigned the same image.
Bitmap image = loadBitmap(); // Load an image into an android.graphics.Bitmap
Texture texture = new Texture(image, image, image, image, image, image, Texture.Format.RGBA8);

Scene scene = new Scene();
scene.setBackgroundCubeTexture(texture);
The six parameters for the Texture constructor above, nx, px, ny, py, nz, and pz, specify the Bitmap to use for each cube face (where nx is the face in the negative-x direction, px is the face in the positive-x direction, and so on).
Scene Graph
Underlying the Scene is a full-featured 3D scene graph engine. A scene graph is a hierarchical tree structure of nodes that allows developers to intuitively construct a 3D environment. The root node can be retrieved via Scene.getRootNode(). Sub-nodes are represented by child Node objects. Each Node represents a position and transform in 3D space, to which you can attach 3D objects, lights, sound, or other content.
A Node by itself has no visible content when it is rendered; it represents only a coordinate space transform (position, rotation, and scale) relative to its parent Node. You use a hierarchy of Node objects to model your scene in a way that makes sense for your app.
For example, in the scene below Text A's rendered position will be [0, 1, -1], and Text B's rendered position will be [1, 1, -1]. Similarly, Text A's final scale will be [2, 2, 2], while Text B's final scale will be [8, 8, 8], since it picks up the scale from both its parent nodes.
Scene scene = new Scene();

Node nodeA = new Node();
nodeA.setPosition(new Vector(0, 1, -1));
nodeA.setScale(new Vector(2, 2, 2));

Text textA = new Text();
textA.setText("Text A");
nodeA.setGeometry(textA);

Node nodeB = new Node();
nodeB.setPosition(new Vector(1, 0, 0));
nodeB.setScale(new Vector(4, 4, 4));

Text textB = new Text();
textB.setText("Text B");
nodeB.setGeometry(textB);

scene.addChildNode(nodeA);
nodeA.addChildNode(nodeB);
To take a more concrete example, suppose your app presents an animated view of a solar system. You can construct a Node hierarchy that models celestial bodies relative to one another. Each body can be a Node, with its position in its orbit defined in the coordinate system of its parent. The sun would define its own coordinate space, and the Earth would position itself in that space. At the same time, the Earth would define its own coordinate space in which the moon would position itself. The snippet below shows a simple solar system.
Node sun = new Node();
node.setGeometry(new Sphere(30));

Node earth = new Node();
earth.setPosition(new Vector(100, 0, 0));
earth.setGeometry(new Sphere(2));
sun.addChildNode(earth);

Node moon = new Node();
moon.setPosition(new Vector(10, 0, 0));
moon.setGeometry(new Sphere(0.1f));
earth.addChildNode(moon);
This scene hierarchy makes it intuitive to animate the celestial bodies: the revolution of the moon around the Earth and the Earth around the sun combine such that the moon follows the planet around the sun.
Updated over 4 years ago